Friday, June 1, 2012

How to Solve Microsoft Exchange 2010 Installation Problem Part II

Hello Readers,

another good article when you have trouble installing your Exchange Server 2010 by Paul Cunningham from http://exchangeserverpro.com

The second trouble that i have when we want to install the exchange server is : "The Exchange Server is in an inconsistent state. Only disaster recovery mode is available. Please use Setup /m:RecoverServer to recover this Exchange server".


This can occur when the Exchange server object already exists within Active Directory, which can occur when a server has been uninstalled and you are attempting to reinstall it.
If you do not wish to use disaster recovery mode to reinstall the server you must first remove the Exchange server object from Active Directory.
Launch ADSIEdit.msc and navigate to CN=Configuration, CN=Services, CN=Microsoft Exchange, CN=, CN=Administrative Groups, CN= , CN=Servers, CN=, and then delete the server object.
In this example screenshot the server name is EX2.

After deleting the object you may need to wait for the change to replicate throughout Active Directory.  Then you can relaunch Exchange setup and proceed with your installation as planned.

If you found you can not run  adsiedit.msc on your server. probably you just need to install the support tools on the server. below are source where you can find the support tools for your server

To install ADSI Edit on computers running Windows Server® 2003 or Windows® XP operating systems, install Windows Server 2003 Support Tools from the Windows Server 2003 product CD or from the Microsoft Download Center (http://go.microsoft.com/fwlink/?LinkId=100114). For more information about how to install Windows Support Tools from the product CD, see Install Windows Support Tools (http://go.microsoft.com/fwlink/?LinkId=62270).

On servers running Windows Server 2008 or Windows Server 2008 R2, ADSI Edit is installed when you install the Active Directory Domain Services (AD DS) role to make a server a domain controller. You can also install Windows Server 2008 Remote Server Administration Tools (RSAT) on domain member servers or stand-alone servers. For specific instructions, see Installing or Removing the Remote Server Administration Tools Pack (http://go.microsoft.com/fwlink/?LinkId=143345).

To install ADSI Edit on computers running Windows Vista® with Service Pack 1 (SP1) or Windows 7, you must install RSAT. For more information and to download RSAT, see article 941314 in the Microsoft Knowledge Base (http://go.microsoft.com/fwlink/?LinkID=116179).

source : microsoft technet and exchangeserverpro.com
Wednesday, May 30, 2012

How to Solve Microsoft Exchange 2010 Installation Problem

Hi Readers that come stop by to my blog by google I believe :D

I am in the middle trying to install Microsoft Exchange 2010 at Windows Server 2008 R2 64bit at my Virtualbox. and i have several problem in the installation progress. so i tried to google it and found 2 blogs that solving my problem.

one is : http://exchangeblogger.wordpress.com
The article was written by -Zohaib Hafeez

another one is : http://www.mediazone.nl/post/Installing-Microsoft-Exchange-2010-the-botlenecks-and-the-fixes.aspx

both blogs are really good and all credits should go to them. however i will put the here the content of the article in case both site are inaccessible.


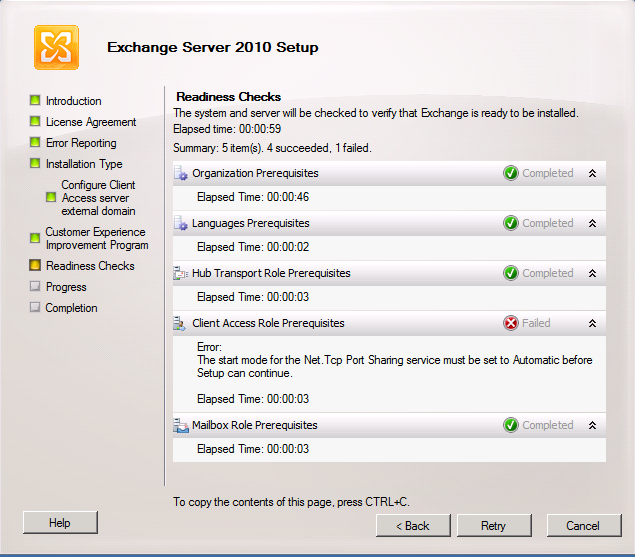
In order to install Exchange 2010 Client Access Server role installation on Windows 2008 R2 its one of the pre-requisite that you change the startup mode for Net. TCP Port Sharing service from manual to automatic otherwise you will see this error during Rediness Check.

Here are some of the errors I had during install since not all prerequired features were met in my server 2008 installation:

“The start mode for the Net. TCP Port Sharing service must be set to Automatic before Setup can continue.”
Exchanage 2010 Error
Resolution:
Change startup mode of “Net.Tcp Port Sharing Service” from Manual to Auto by running this command in PowerShell.
Set-Service NetTcpPortSharing -StartupType Automatic


Error:
Unable to read data from the Metabase. Ensure that Microsoft Internet Information Services is installed.
Recommended Action: http://go.microsoft.com/fwlink/?linkid=30939&l=en&v=ExBPA.4&id=a4a4d339-4009-4fb7-b842-ca2ba79f13f0

Error:
Unable to access the 'Default Web Site' on this computer.
Recommended Action: http://go.microsoft.com/fwlink/?linkid=30939&l=en&v=ExBPA.4&id=aadc8176-1c47-49b7-83a0-9493a1093af

 
You have to add the IIS 6.0 compatibility features to your server with server manager.
you can go to server manager and select Web Server (IIS) and check the list as below picture show


Hope this article will help to overcome your problem with Ms.Exchange 2010 installation, and please check another information to those blogs if you can find your problem listed here.

all credits go to the writer of the article :)

Friday, July 8, 2011

GSM Modem Unlock Code

If you have bundled up GSM modem with below model, probably you have locked modem. if you want to unlock it and use it for different operator, you can use master code.


Huawei
Model support : E1550, E155, E156, E156G, E160, E160G, E161, E166, E169, E169G, E170, E172, E176, E180, E182E, E196, E226, E270, E271, E272, E510, E612, E618, E620, E630, E630+, E660, E660A, E800, E870, E880, EG162, EG162G, EG602, EG602G, Vodafone K2540 · Vodafone K3515 · Vodafone K3520 · Vodafone K3565 · Vodafone K3715 .

ZTE
SUPPORT : ZTE SFR 231, ZTE SFR 232, ZTE SFR 341, ZTE SFR 342, ZTE ORANGE VEGAS, ZTE VODAFONE INDIE, ZTE X760, ZTE X761, ZTE X960, ZTE GX760, ZTE GX761, ZTE T-Mobile Vairy Touch


Download

Tuesday, February 15, 2011

[Tips] Blackberry Cant Attach Document File

sekedar sharing, karena akhirnya saya berhasil menemukan solusi dari permasalahan ini


pertama ciri-ciri blackberry anda tidak bisa attach document :
1. compose email baru, insert file akan muncul pop up
2. kemudian hanya pointing ke folder picture dan hanya file picture yang bisa di attach.
3. tidak bisa pindah folder, atau memilih device memory atau memory card
4. selalu ada unsupported file jika mencoba attach file doc secara langsung via file explorer

penyebab dari ini adalah :

anda memiliki 2 account yang di register ke email setting, ini terjadi ketika anda pindah device, anda membuat account baru. bukan memakai account lama dan mengregister device baru di web ([I]provider[/I].blackberry.com)
sehingga menyebabkan ada service book atau policy yang nyangkut..


solusinya :

bawa ke customer centre provider anda, contoh ane bawa ke Grapari Gandaria City, minta di delete account yang lama yg dulu ada, atau kalau tidak ketemu account yang lama. minta delete account yang sekarang, dan dibuatkan account baru. nanti kita akan meregister ulang semua email kita dan bravo! email kita sudah bisa attach document file lagi.

Translate version only for solution:

take the phone to your telecom provider, tell them to remove your account in email setting and then create new one. you will need to register your email again and begin sync.
bravo! you can attach your document file again.

the root of this cause because you have two account that stuck each other, i believe this because you register new id in email setting when you change your blackberry device instead of using old account and choose detect new device in the options.

by TongSanCong @ Kaskus

Monday, August 30, 2010

How to Setup Sharing Mailbox on Microsoft Outlook 2003

Setup Sharing Mailbox on Microsoft Outlook 2003
(Step 1-8 is for user that will be use for sharing)

1. Right Click on Mailbox and then choose Properties


2. Choose Permissions tab


3. Add user that will be have permission to sharing, and then click OK.

4. Set permission to Publishing Editor, click OK
5. Do step 1-4 to all folder that need to be shared and include Sent items, outbox and etc
6. Go to Tools-Options- Delegates


7. Add the user same like step 3, Click Ok
8. Set permission that to be needed as requested, Click Ok after that.
( Note : Don’t check Automatically send a message to delegate summarizing these permissions)

9.Go to File- Open- Other User’s Folder (Setting on User will have view on)

10.Click on name, select user, then choose folder type that want to be shared, Click ok and finish


Good Luck and Happy Try :)

How to Configure of ActiveX Viewer for Crystal Reports


Configuration of ActiveX Viewer for Crystal Reports


A. Remove old ActiveX Viewer DLL files and registry entries

Step 1) Open your Internet Explorer -Tools - Internet Options.

Step 2) On the General Tab, click the Settings icon found in the Temporary Internet section. Click on the View Objects icon located in the lower right corner of the window.

Step 3) By clicking the View Objects icon, you will open a directory of files. Look for a file that contains the words Crystal Report Viewer. You might find Crystal Report Smart Viewer 7 or Crystal Report Smart Viewer 9. In any event, if you find a file with the words Crystal Report Viewer as part of the text, right click on the file and delete it. If it is not there continue with the next step.

Step 4) Close your Internet browser

Step 5) Go to the Start menu; click on Search; click on For Files and Folders; and click on All Files and Folders. Search for and delete the following files:

a. Crviewer.dll (or Crviewer9.dll if you are using Crystal Reports version 9)
b. Sviewhlp.dll
c. Swebrs.dll

Step 6) Go to the Start menu; click Run; type “regedit” in the Open: box; and click OK. The Registry Editor will be displayed.

Step 7) In the Registry Editor, on the Edit menu click Find; type “crviewer.dll” in dialogue box; and click the Find Next icon.

Step 8) If you find a registry key, delete it by right clicking on the file and selecting delete. Continue clicking Find Next until the computer finishes searching through the entire registry. (please note: files with the word “Default” in the name cannot be deleted).

Step 9) Repeat steps 6 to 8 for the files “Crviewer9.dll” (if you are using CR 9 or CE 9), “Sviewhlp.dll,” and “Swebrs.dll.”

B. Download and Install New ActiveX Viewer

Step 1) Open Internet Explorer. Attempt to view any report from the Reports menu. If you are prompted to install the new ActiveX Viewer, click Yes to install the viewer. Retry displaying any report.

If a report appears, congratulations – you have completed the process and do not need to proceed with the rest of these instructions. However, if the report does not appear, you will need to manually install the new ActiveX Viewer by proceeding to the next step.

Step 2) Download the attached file “ActiveXViewer.cab” to your computer and extract its contents using winzip to a temporary folder.

Step 3) Move the files “Crviewer.dll” “Sviewhlp.dll” and “Swebrs.dll” to the c:\windows\System32 folder. Keep this folder visible.

Step 4) Go to the Start menu; click Run; and type “regsvr32” in the open dialogue box

Step 5) Drag and drop the Crviewer.dll file icon from the System32 folder onto the Run dialog box. Click OK.

Step 6) You should receive an acknowledgement that says “dll register server in c:\windows\system32\crveiwer.dll succeeded.”

Step 7) Repeat steps 4 to 6 for the files “Sviewhlp.dll,” and “Swebrs.dll.”

Or you can click on install CRViewer.bat to install the library

and your done!

this will help if you find trouble with some web page that using Crystal Report that wont show up.

Cheers
HD

Tuesday, February 2, 2010

Problem for Canon PowerShot S2 IS Digital Camera BLACK SCREEN

okay.. This week i got some serious problem with my friend S3 Powershot camera.. it has a blank LCD and Viewvinder..

so i googling up and find some answer for this problem.. finally.. its work and save me from wasting $100-$200 to repair my friend camera

here the help :

Can you not take pictures, or is it that a completely black image results if you do press the shutter button?

In the case where you get a black image, the following may be of help:

This is a common problem in older Canon S2 IS cameras, especially ones that have not been regularly used. What happens is that the lens iris gets stuck at a small aperture. Most often you can get function back. Here's how:

Turn the camera on in shooting mode.

Turn the mode selector to shutter priority ("Tv").

Use the four-way button on the back to set the shutter speed to 15 seconds. That's right, 15 seconds.

Press the shutter release. Count to seven, then pop open the battery compartment.

Wait several seconds, then close the battery compartment.

You may need to repeat the above sequence several times to unstick the iris. If that does not accomplish it, you will likely have to send the camera in for repair.

Once you have it working again, you should use the camera regularly to keep it from sticking again.

thx to welsberr