If you have bundled up GSM modem with below model, probably you have locked modem. if you want to unlock it and use it for different operator, you can use master code.
Huawei
Model support : E1550, E155, E156, E156G, E160, E160G, E161, E166, E169, E169G, E170, E172, E176, E180, E182E, E196, E226, E270, E271, E272, E510, E612, E618, E620, E630, E630+, E660, E660A, E800, E870, E880, EG162, EG162G, EG602, EG602G, Vodafone K2540 · Vodafone K3515 · Vodafone K3520 · Vodafone K3565 · Vodafone K3715 .
ZTE
SUPPORT : ZTE SFR 231, ZTE SFR 232, ZTE SFR 341, ZTE SFR 342, ZTE ORANGE VEGAS, ZTE VODAFONE INDIE, ZTE X760, ZTE X761, ZTE X960, ZTE GX760, ZTE GX761, ZTE T-Mobile Vairy Touch
Download
Friday, July 8, 2011
Tuesday, February 15, 2011
[Tips] Blackberry Cant Attach Document File
sekedar sharing, karena akhirnya saya berhasil menemukan solusi dari permasalahan ini
pertama ciri-ciri blackberry anda tidak bisa attach document :
1. compose email baru, insert file akan muncul pop up
2. kemudian hanya pointing ke folder picture dan hanya file picture yang bisa di attach.
3. tidak bisa pindah folder, atau memilih device memory atau memory card
4. selalu ada unsupported file jika mencoba attach file doc secara langsung via file explorer
penyebab dari ini adalah :
anda memiliki 2 account yang di register ke email setting, ini terjadi ketika anda pindah device, anda membuat account baru. bukan memakai account lama dan mengregister device baru di web ([I]provider[/I].blackberry.com)
sehingga menyebabkan ada service book atau policy yang nyangkut..
solusinya :
bawa ke customer centre provider anda, contoh ane bawa ke Grapari Gandaria City, minta di delete account yang lama yg dulu ada, atau kalau tidak ketemu account yang lama. minta delete account yang sekarang, dan dibuatkan account baru. nanti kita akan meregister ulang semua email kita dan bravo! email kita sudah bisa attach document file lagi.
Translate version only for solution:
take the phone to your telecom provider, tell them to remove your account in email setting and then create new one. you will need to register your email again and begin sync.
bravo! you can attach your document file again.
the root of this cause because you have two account that stuck each other, i believe this because you register new id in email setting when you change your blackberry device instead of using old account and choose detect new device in the options.
by TongSanCong @ Kaskus
Monday, August 30, 2010
How to Setup Sharing Mailbox on Microsoft Outlook 2003
Setup Sharing Mailbox on Microsoft Outlook 2003
(Step 1-8 is for user that will be use for sharing)
1. Right Click on Mailbox and then choose Properties
2. Choose Permissions tab
3. Add user that will be have permission to sharing, and then click OK.
4. Set permission to Publishing Editor, click OK
5. Do step 1-4 to all folder that need to be shared and include Sent items, outbox and etc
6. Go to Tools-Options- Delegates
7. Add the user same like step 3, Click Ok
8. Set permission that to be needed as requested, Click Ok after that.
( Note : Don’t check Automatically send a message to delegate summarizing these permissions)
9.Go to File- Open- Other User’s Folder (Setting on User will have view on)
10.Click on name, select user, then choose folder type that want to be shared, Click ok and finish
Good Luck and Happy Try :)
How to Configure of ActiveX Viewer for Crystal Reports
Configuration of ActiveX Viewer for Crystal Reports
A. Remove old ActiveX Viewer DLL files and registry entries
Step 1) Open your Internet Explorer -Tools - Internet Options.
Step 2) On the General Tab, click the Settings icon found in the Temporary Internet section. Click on the View Objects icon located in the lower right corner of the window.
Step 3) By clicking the View Objects icon, you will open a directory of files. Look for a file that contains the words Crystal Report Viewer. You might find Crystal Report Smart Viewer 7 or Crystal Report Smart Viewer 9. In any event, if you find a file with the words Crystal Report Viewer as part of the text, right click on the file and delete it. If it is not there continue with the next step.
Step 4) Close your Internet browser
Step 5) Go to the Start menu; click on Search; click on For Files and Folders; and click on All Files and Folders. Search for and delete the following files:
a. Crviewer.dll (or Crviewer9.dll if you are using Crystal Reports version 9)
b. Sviewhlp.dll
c. Swebrs.dll
Step 6) Go to the Start menu; click Run; type “regedit” in the Open: box; and click OK. The Registry Editor will be displayed.
Step 7) In the Registry Editor, on the Edit menu click Find; type “crviewer.dll” in dialogue box; and click the Find Next icon.
Step 8) If you find a registry key, delete it by right clicking on the file and selecting delete. Continue clicking Find Next until the computer finishes searching through the entire registry. (please note: files with the word “Default” in the name cannot be deleted).
Step 9) Repeat steps 6 to 8 for the files “Crviewer9.dll” (if you are using CR 9 or CE 9), “Sviewhlp.dll,” and “Swebrs.dll.”
B. Download and Install New ActiveX Viewer
Step 1) Open Internet Explorer. Attempt to view any report from the Reports menu. If you are prompted to install the new ActiveX Viewer, click Yes to install the viewer. Retry displaying any report.
If a report appears, congratulations – you have completed the process and do not need to proceed with the rest of these instructions. However, if the report does not appear, you will need to manually install the new ActiveX Viewer by proceeding to the next step.
Step 2) Download the attached file “ActiveXViewer.cab” to your computer and extract its contents using winzip to a temporary folder.
Step 3) Move the files “Crviewer.dll” “Sviewhlp.dll” and “Swebrs.dll” to the c:\windows\System32 folder. Keep this folder visible.
Step 4) Go to the Start menu; click Run; and type “regsvr32” in the open dialogue box
Step 5) Drag and drop the Crviewer.dll file icon from the System32 folder onto the Run dialog box. Click OK.
Step 6) You should receive an acknowledgement that says “dll register server in c:\windows\system32\crveiwer.dll succeeded.”
Step 7) Repeat steps 4 to 6 for the files “Sviewhlp.dll,” and “Swebrs.dll.”
Or you can click on install CRViewer.bat to install the library
and your done!
this will help if you find trouble with some web page that using Crystal Report that wont show up.
Cheers
HD
Tuesday, February 2, 2010
Problem for Canon PowerShot S2 IS Digital Camera BLACK SCREEN
okay.. This week i got some serious problem with my friend S3 Powershot camera.. it has a blank LCD and Viewvinder..
so i googling up and find some answer for this problem.. finally.. its work and save me from wasting $100-$200 to repair my friend camera
here the help :
Can you not take pictures, or is it that a completely black image results if you do press the shutter button?
In the case where you get a black image, the following may be of help:
This is a common problem in older Canon S2 IS cameras, especially ones that have not been regularly used. What happens is that the lens iris gets stuck at a small aperture. Most often you can get function back. Here's how:
Turn the camera on in shooting mode.
Turn the mode selector to shutter priority ("Tv").
Use the four-way button on the back to set the shutter speed to 15 seconds. That's right, 15 seconds.
Press the shutter release. Count to seven, then pop open the battery compartment.
Wait several seconds, then close the battery compartment.
You may need to repeat the above sequence several times to unstick the iris. If that does not accomplish it, you will likely have to send the camera in for repair.
Once you have it working again, you should use the camera regularly to keep it from sticking again.
thx to welsberr
Monday, August 31, 2009
How to stop CHKDSK runs at every boot
Well, pernahkah anda mengalami scandisk terus menerus pada saat menyalakan dan merestart PC anda? jika iya maka anda mengalami perintah CHKDSK yang terus menerus di jalankan pada saat booting..
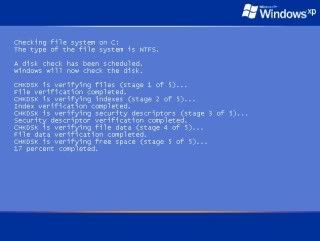
chkdsk adalah salah satu fitur dari Microsoft Windows yang bertugas melakukan pengecekan terhadap hard disk yang kita miliki, apakah memiliki gangguan atau bad sector, biasanya perintah ini dipanggil bila Windows tidak dishutdown secara sempurna, atau di restart tidak secara prosedur..
hard drive tersebut akan di mark oleh windows sebagai "dirty" drive dan akan memanggil perintah chkdsk untuk membersihkannya..
untuk menghilangkan chkdsk ini kita dapat menggunakan perintah dibawah ini pada Command Prompt,
chkdsk /F
namun, ada kalanya chkdsk ini "menyangkut", proses scanning tidak bisa diselesaikan dan hang saat proses scanning..
maka ada baiknya menggunakan tools lain untuk melakukan pengecekan terhadap hard disk anda apakah memiliki bad sector atau kerusakan lainnya..
namun bila anda yakin hard disk anda tidak rusak dan Windows anda tetap menganggap drive anda "dirty" maka ada perintah yang dapat dipanggil untuk membantu mengatasi problem ini,yaitu :
chkntfs /d
perintah ini akan merestore kembali pada kondisi semula dan menghapus perintah chkdsk yang menumpuk atau tidak perlu dilaksanakan lagi
namun, perintah ini pun belum tentu mengatasi masalah chkdsk yang selalu muncul pada setiap booting. maka gunakan perintah :
chkdsk /X (drive yang mengalami chkdsk terus menerus), Contoh :
chkdsk /X C: atau bila memiliki 2 drive atau lebih,
chkdsk /X C: D:
perintah ini akan mengexclude drive anda yang terus menerus dianggap "dirty" oleh windows
well, semoga membantu mengatasi masalah anda
NB: Command prompt dapat dipanggil melalui Start-Run-cmd
Vista@forum.chip.co.id
Sunday, August 16, 2009
Tutorial : How to install Mac OS X to HP Mini 110-1013TU
Akhirnya kesampaian juga punya netbook, pikiran pertama yang ada setelah punya netbook, adalah mo ngutak ngatik apa ya..
akhirnya pilihan jatuh ke Mac OS X a.k.a Leopard pake distro nya Kalyway 10.5.2, ternyata menginstall mac os ini ga segampang install windows..mungkin karena ini adalah versi hack nya yang lebih dikenal dengan istilah hackintosh
Baik kita mulai aja.. yang perlu disiapin sebelum mulai mencoba install mac os ke HP Mini kita,disini saya menggunakan usb 4 Gb sebagai boot instaler nya karena dvd eksternal saya ga bisa membaca dvd dengan baik lagi.
1. Distro Kalyway 10.5.2
2. USB Flashdisk (Min 4GB) atau DVD kosong
3. Jika menggunakan UFD sebagai instalernya maka perlu disiapkan
3.1 Leopard HD Instaler Helper download
3.2 unetbootin download
3.3 PowerISO atau Magic ISO (optional)
Oke, kita mulai saja tutor pertama, kita buat dulu installer nya via usb.
Good Luck
Vista@Forum.chip.co.id
akhirnya pilihan jatuh ke Mac OS X a.k.a Leopard pake distro nya Kalyway 10.5.2, ternyata menginstall mac os ini ga segampang install windows..mungkin karena ini adalah versi hack nya yang lebih dikenal dengan istilah hackintosh
Baik kita mulai aja.. yang perlu disiapin sebelum mulai mencoba install mac os ke HP Mini kita,disini saya menggunakan usb 4 Gb sebagai boot instaler nya karena dvd eksternal saya ga bisa membaca dvd dengan baik lagi.
1. Distro Kalyway 10.5.2
2. USB Flashdisk (Min 4GB) atau DVD kosong
3. Jika menggunakan UFD sebagai instalernya maka perlu disiapkan
3.1 Leopard HD Instaler Helper download
3.2 unetbootin download
3.3 PowerISO atau Magic ISO (optional)
Oke, kita mulai saja tutor pertama, kita buat dulu installer nya via usb.
- Jalankan unetbootin, pilih disk image, browse ke folder ISO yang kita punya, lalu open dan ok
- tunggu proses, setelah itu jalan kan Leopard HD instaler Helper
- browse ke folder ISO kalyway, lalu open
- pilih drive usb, uncentang tboot.ini???boot
- lalu klik kolom write atau berlabel ??! (bila tidak bisa di klik, uncentang dan kemudian centang lagi ?? disebelahnya, proses ini memang sering terjadi error)
- tunggu proses write kelar..maka USB anda siap booting ( ulang proses ini bila USB msh blm terbaca saat booting)
- Boot dengan Usb yang telah kita siapkan instaler kalyway 10.5.2 didalamnya
- Setelah berhasil masuk kedalam welcome screen dari instaler ini, Pilih utilities -> Disk Utility
- Pilih Hardisk atau partisi yang akan di install, kemudian pilih tab erase dan kemudian erase drive tersebut. (Erase dengan format HSF+ (Journaled) )
- keluar dari Disk Utility
- Click Next, accept agreement
- pilih drive tempat kita yang tadi sudah kita buat
- click next, kemudian pilih Customize, centang SSE2_AHCI (anda bisa customize driver yang anda ingin instal)
- buka folder patch, centang cpus=1
- kemudian pilih done dan lanjutkan install sampai selesai
- masukan perintah -v -legacy cpus=1 -s, kemudian ketikan perintah-perintah
- /sbin/fsck -fy
/sbin/mount -uw / (Enter)
rm -rf /System/Library/Extensions/AppleSMC.kext (Enter)
rm -rf /System/Library/Extensions.mkext (Enter)
rm -rf /System/Library/Caches/* (Enter) - ketik exit dan booting masuk ke welcome screen
- perintah ini dapat digunakan ketika booting pertama kali setelah instalasi selesai, biasanya akan menemui masalah dengan stuck pada loading screen atau looping restart
Good Luck
Vista@Forum.chip.co.id
Subscribe to:
Posts (Atom)